Create a Repeat Cycle Menu
Repeat Cycle Menu
The Repeat Cycle Menu offers users the ability to cycle through menus by however many weeks your cafeteria runs a cycle. Cycle menus can be created from the menu summary page after a specific location has been granted the ability to offer repeat cycle menus. In this section, we will illustrate how to give access to locations to offer repeat cycle menus, how to create a repeat cycle menu, and how to build out the menu. Repeat cycle menus operate differently than the monthly or concept menus in how they are accessed, displayed as well as subtle differences in copying menus forward, limitations on adding connected text, and the ability to utilize the “All Weeks” page.
How To Setup Locations For Repet Cycle Menus
When first creating a menu, you need to specify the type of menu you are creating by location. To do this, you must first click into the “Master” tab on the left-hand panel. Then locate the “location” tab and click into that section.
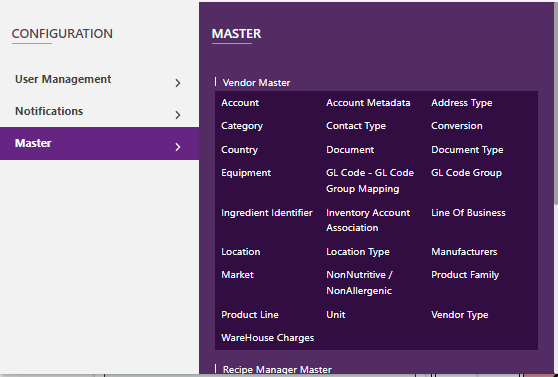
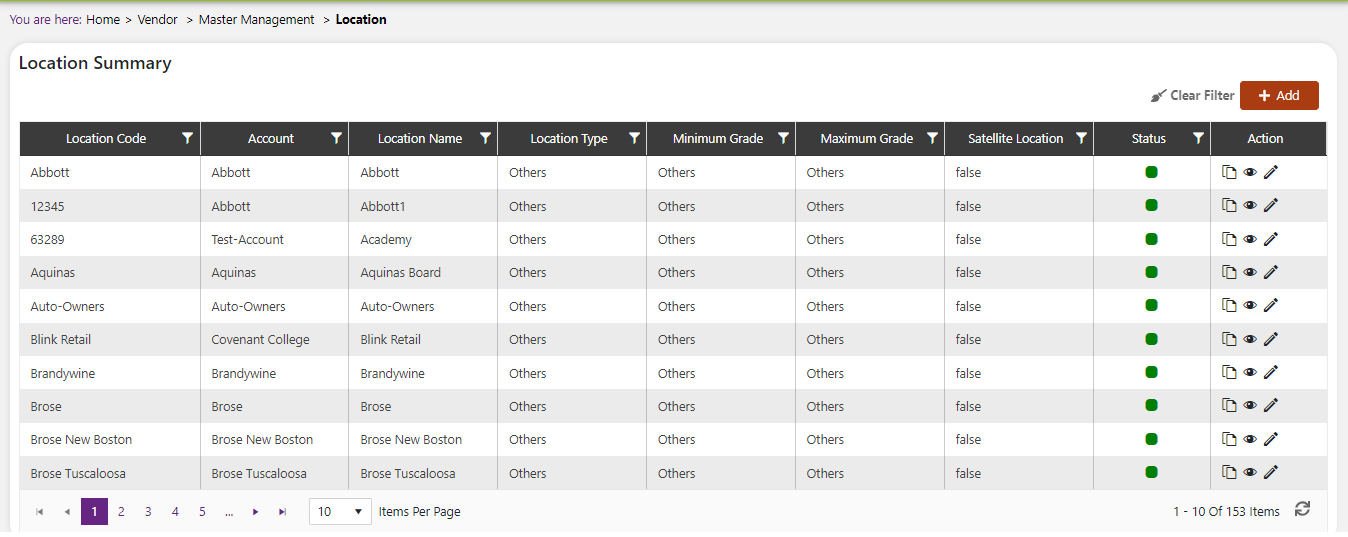
You will be taken to summary screen displaying all locations available for your company that you have inputted into CulinarySuite. Here, you will click the edit icon ![]() on the location for which you want to create a repeat cycle menu for.
on the location for which you want to create a repeat cycle menu for.
Clicking the edit icon will take you to a page like the one below.
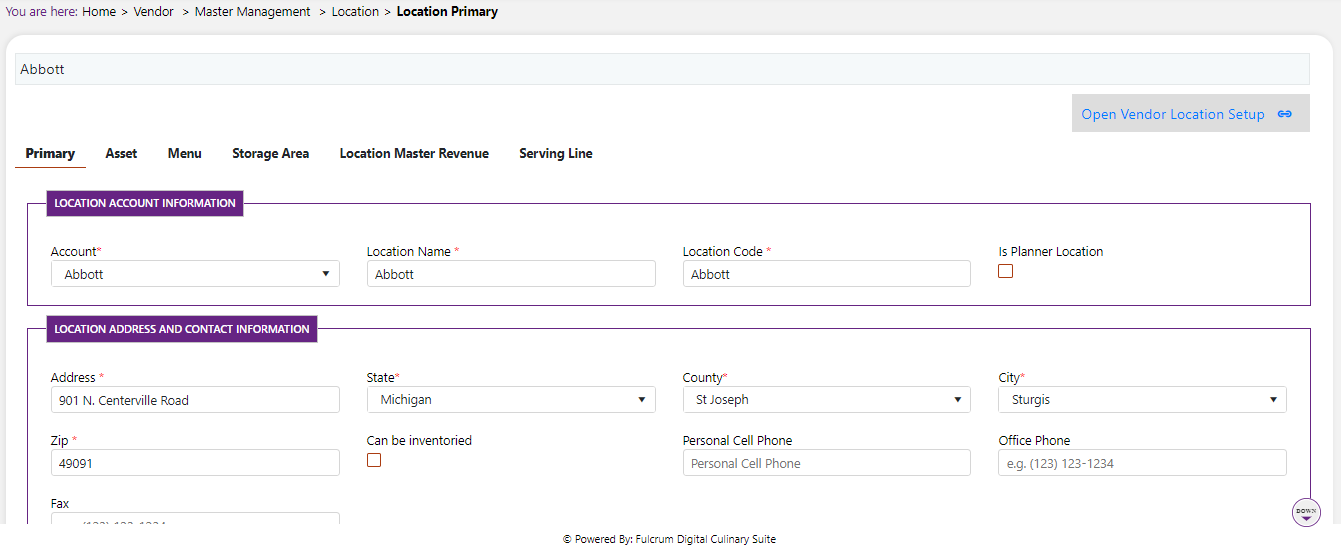
From here, you will need to click inside the tab that says “Menu”
![]()
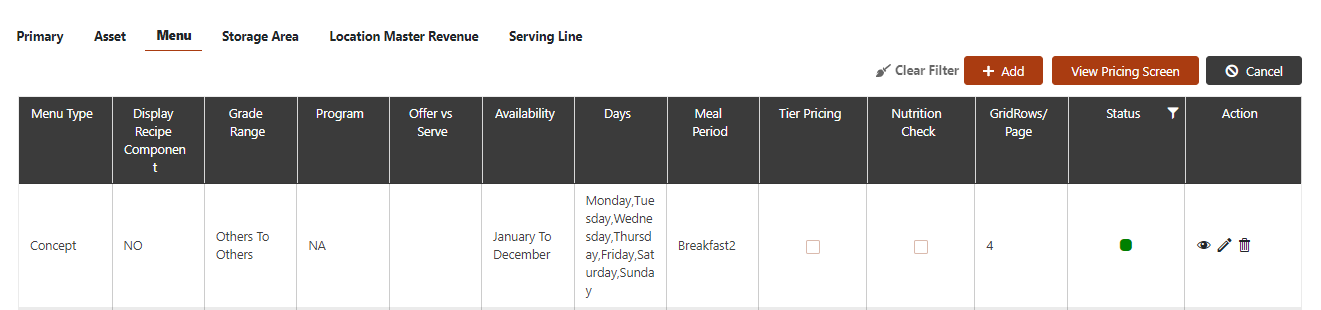
Here you will see all the available menus for this location. If there is no data available, then you will need to create a location menu by hitting the “add” button on the right side of the screen.
After clicking the add button, a popup menu will display on the right side of the screen displaying the necessary information to create a location menu.
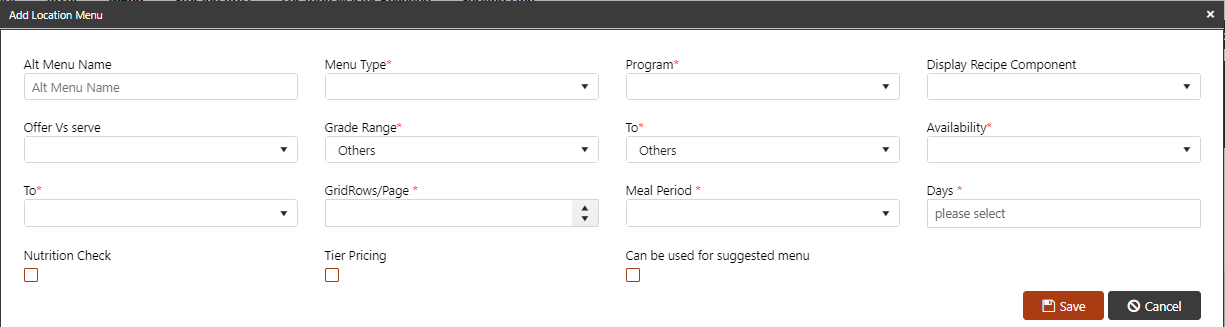
Select “Repeat Cycle” under “Menu Type” and fill in all the other required information then your location will be prepared to add items to the menu.
If you are creating a new location, or this is the first time you are adding a menu to this location, you may find that when you go to create a menu that there are no products or recipes available. If you have this issue, you will need to go to the Order Guide and add products to the account associated with that location. More information about this can be found in the Purchase User Guide.
How To Create Repeat Cycle Menu
After setting up all information about a location menu, now you will be able to create and build out your menu with all the items from the Menu Summary page.
Hover over the menu module then locate the “Menu Summary” pop-out and click on it. You will be brought to the page like the one below.
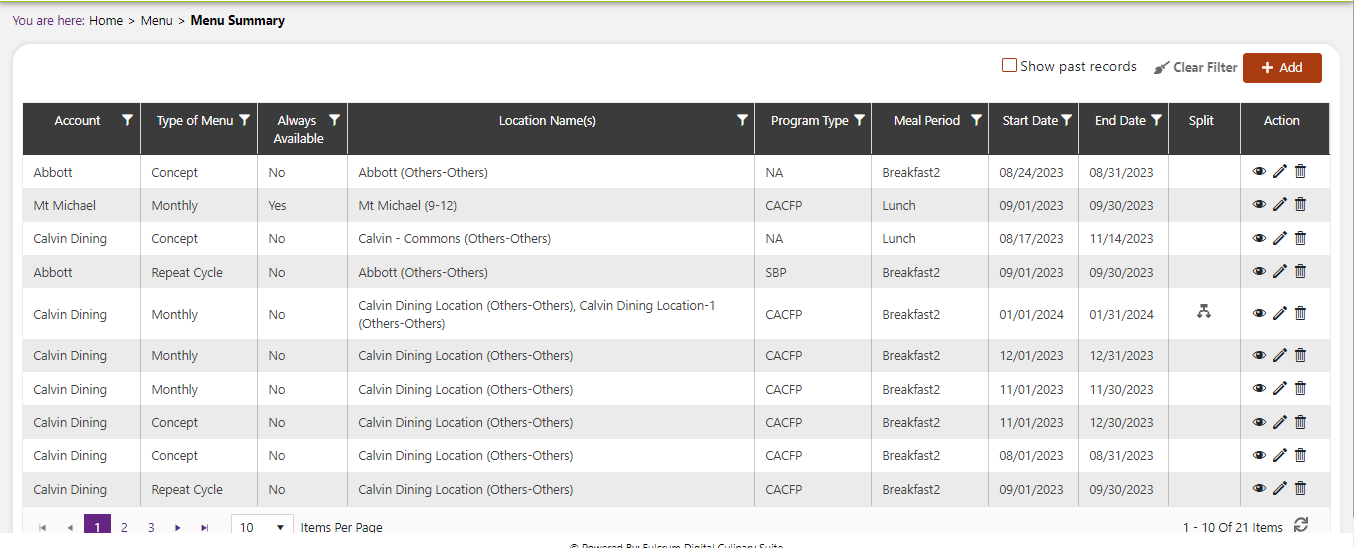
From here, select “add” in the top right corner of the screen. You will be brought to the menu creation page.
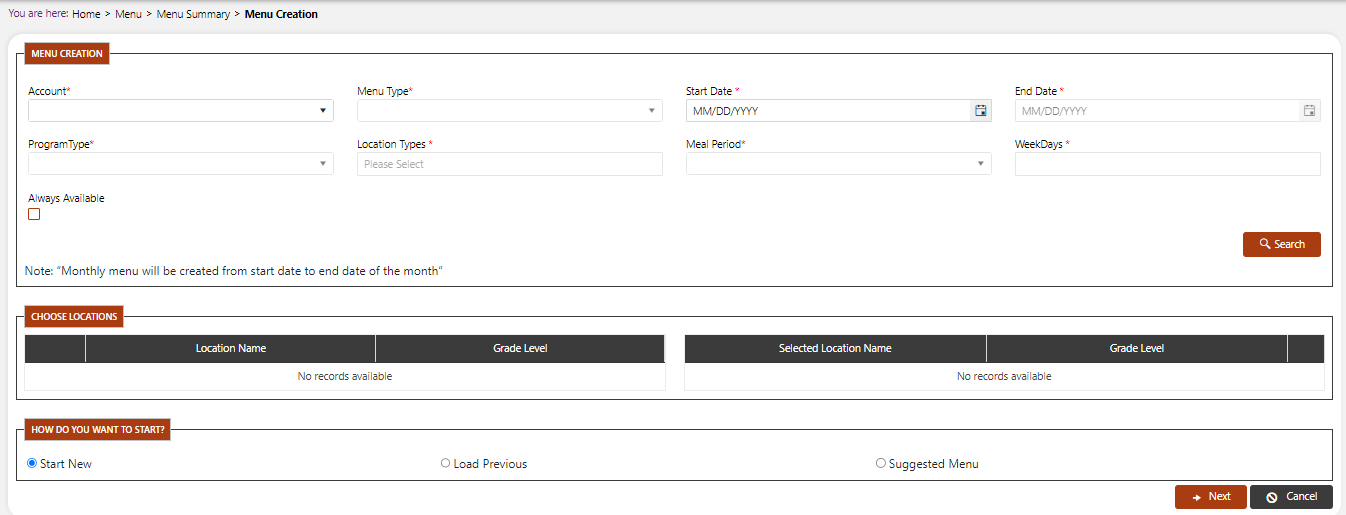
From this menu creation page, input all the required information and in the “Menu Type” section, input “Repeat Cycle”. After all the information is inputted, click the “search” button. This will look for locations that meet the parameters you had set and allow you to choose the locations for which to create menus for.

- Now, you can click and drag the location from the left box to the right box where it says “Selected Location Name” by dragging from the “drag” icon
You can confirm that the location has been dragged when you see the location name and grade level appear in the right box

You will see a box below that asks “How do you want to start?” if you are creating this menu from scratch, flag the “start new” box, if you want to load a previous menu, flag the “load previous” box, and if you want to use a suggested menu, flag the “suggested menu” box
Once you have completed all of these steps, select the “Next” button to move onto creating your new menu. You will be taken back to the Menu Summary page. From here, select the menu which you want to build out and you can begin adding items to the menu.
Add Items To Your Repeat Cycle Menu
From the Menu Summary page, locate the account which you want to create a menu for and hit the edit icon to begin adding items to the menu. ![]()
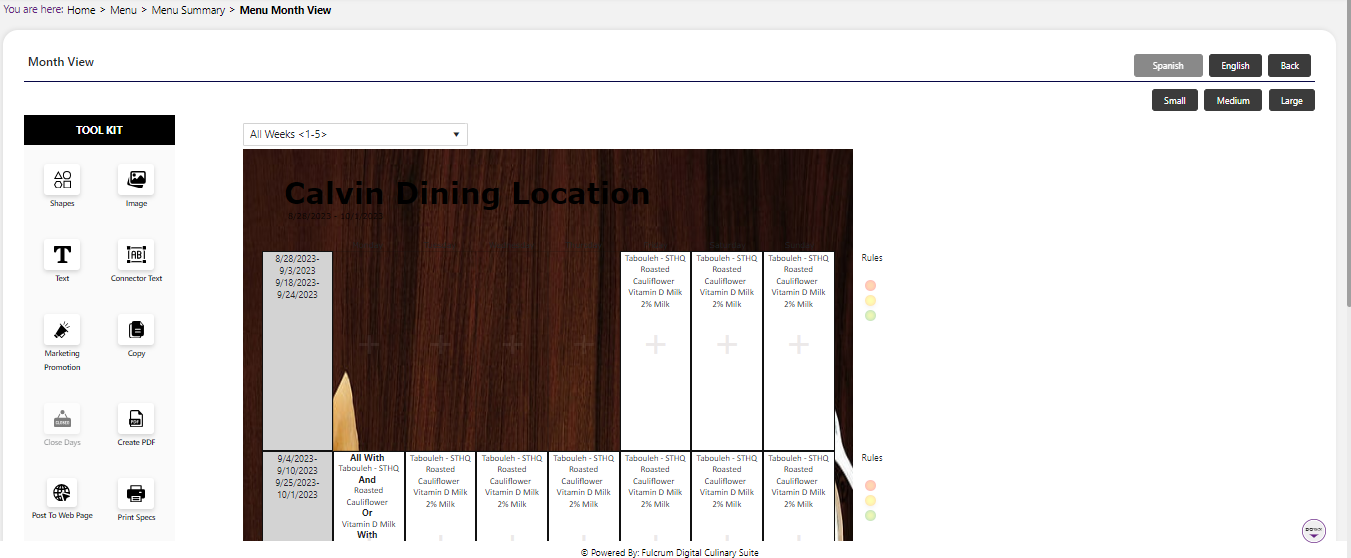
- When you are taken to the Menu Month View page, you will notice the interface is the same as the Monthly Menu. However, the menu format is different for the repeat cycle menu.
In the next two subsections, we will explain the capabilities you have from editing in “All Weeks” view versus “Individual Weeks” view and where you might prefer one over the other.
Add Items In All Weeks View In Repeat Cycle
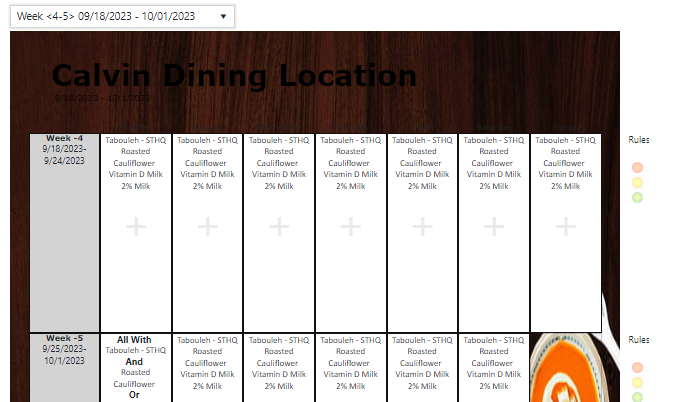
- By default when entering a Repeat Cycle menu, you will see that you will be looking at the “All weeks” view on the top of the screen. For the purposes of this section, we will demonstrate the capabilities and ease of access you have for creating repeat cycle menus from this view.
![]()
- For this specific location we had set a 3-week cycle menu. On the left gray shaded column, it will show the date ranges for the cycle up until the date for which this specific location menu has been set. Let’s take the first row as an example: From 9/20/2021-9/26/2021 and from 10/11/2021-10/17/2021 and from 11/1/2021-11/7/2021, the menu will show items listed on only the Monday and Tuesday in that specific row (in this example from row 1). As you can see in the image below, we have items available for Monday. This means that when the cycle repeats, the first Monday will have “Light Soy Sauce, Pita Bread, and Heartzel Pretzels” available.

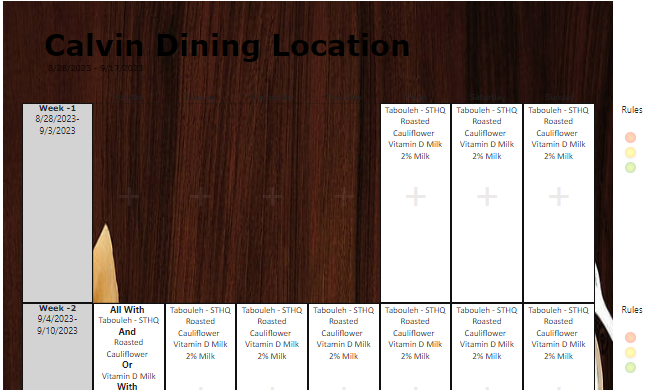
- Automatically, these changes will appear when you change the view from “All weeks” to any specific week in the menu cycle. To change your view, click the dropdown under the “All Weeks” button to choose a specific week to view.

- Click on any of the weeks to see your changes cascade and place the items on the correct dates within your menu. This is an easy way to confirm that you are on the right track. In the example below, we can see we had set the view to “week <4-6> 10/04/2021-10/24/2021” and on the 4th week: 10/11/2021-10/17/2021” the Monday menu which we created in the “All weeks” view is present because we had specified that this is Monday menu for every 1st week in the 3 week cycle starting from 9/20/2021.
The “All weeks” view will not show connector text “and, or” on the menu  . This can be done from the “Individual Week” view but not on the “All Weeks” view. In addition, your “copy forward” capabilities are limited in the “All Weeks” view versus the “Individual Weeks” view. To continue building out your menu and adding items to your menu, refer to the ADD MENU ITEMS part of this user guide.
Add Items In Individual Weeks View For Repeat Cycle
If you are looking to change up the cycle for a specific day or week without affecting the entirety of your cycles that you had created in the “All weeks” view, this change can be made from the “Individual weeks” view. This view is especially helpful for making changes for holiday meals or special events that will change your menu for a short period of time.
- To get to the individual weeks view, hit the dropdown box above the menu to choose the week for which you want to edit

- Once you choose the week you wish to edit, you will notice the format of the page will look different. On the menu, it will display the time period for which you are viewing and the left most column will indicate which week you are viewing.
From this view you can edit and items to each individual day within each week.
In addition, you can add “Connector Text”
in this view to items within each individual week. This is helpful if you are offering 1 main entrée or another, or if you are offering a plethora of side options but want to separate them with an “or”. For more information on Connector Text visit the ADD CONNECTOR TEXT part of this user guide.
Adding Tier Pricing for a Menu Item
Tiered pricing allows users to mark a menu item with specific price points to be displayed on FD MealPlanner application. (Price points can be a kind of information about the menu item, example Discount offer)
Price Point Icon Master
Price point icon master allows user to add all the various kinds of tier price options. This is similar to any other master in the system where user can add a name, description, icon, set the status to active/inactive.
Image: Price Point icon master