Keys to Success
Menus are required to be created 2 months in advance, by the 15^th^ of the month (e.g. June 2019 menu is due April 15, 2019). Access to WMP will remain active. Please ensure that at any point in time, that the client has menus 2 months in advance.
You can post not only the current month but also the next month if so required by the district. Multiple months of menus can be posted to website on DineCentral. At the end of each month the subsequent menu will auto load as the date moves to the new month.
ALLERGAN ALERT: No changes should ever be made to a menu in a current week without sending an email informing all nurses and principals so they can notify the families. When changing a menu, it will take the nutritional data up to 24 hours to catch up.
Menu choices and ADP will drive the purchasing process---be mindful when creating your forecast
Switching ingredients in a recipe impacts the cost and nutritional value; as well as inventory and purchasing since the items suggested to purchase are taken from the ingredients used in the menu recipes.
If you have a request related to recipes not available or not able to add to the menu, mail your request to the Nutrition team
To complete a Location Transfer, complete inventory with the items removed and request a form from Accounting. Send both to accountingdepartment@whitsons.com and Accounting will make the adjustment in the accounting system.
If your client requests an alternative Menu Name change, create a help desk ticket. For example, if a district does not want a specific "Elementary A" menu and a specific "Elementary B" menu and just wants a "School District Elementary Menu", create a help desk ticket.
Food bars should be used as much as possible as they allow you to offer the widest range items on that day
Graphic images should be used as much as possible on the menu. There are hundreds to pick from! Scale the images correctly. Modify as needed to make the best presentation.
Use text boxes to communicate messages to the district like half days, closed days, etc. Use color!
Make sure to use connector text correctly and when needed. This includes item descriptions
Make sure your available daily items are listed properly.
Favorites should be flagged to help you build future menus quickly.
Forecasts should be filled in for any item on the menu
Each concept daily offering should be customized to your location's offerings. Be sure to check text size.
Only recipes specific to the menu that you are creating will display. For example, if you are menuing for an elementary school, only recipes that are "eligible" for elementary school children will display. If creating a concept menu, only recipes specific to that concept menu will display.
The same product/recipe can be made available to the menu under multiple concepts (i.e. if you are offering fries at more than one station on a concept menu, you will now be able to add that recipe to the menu under both concepts).
List of required information on every menu
General Manager name and contact info
Payment info if available
Available daily offerings
Menu Detail Screen:
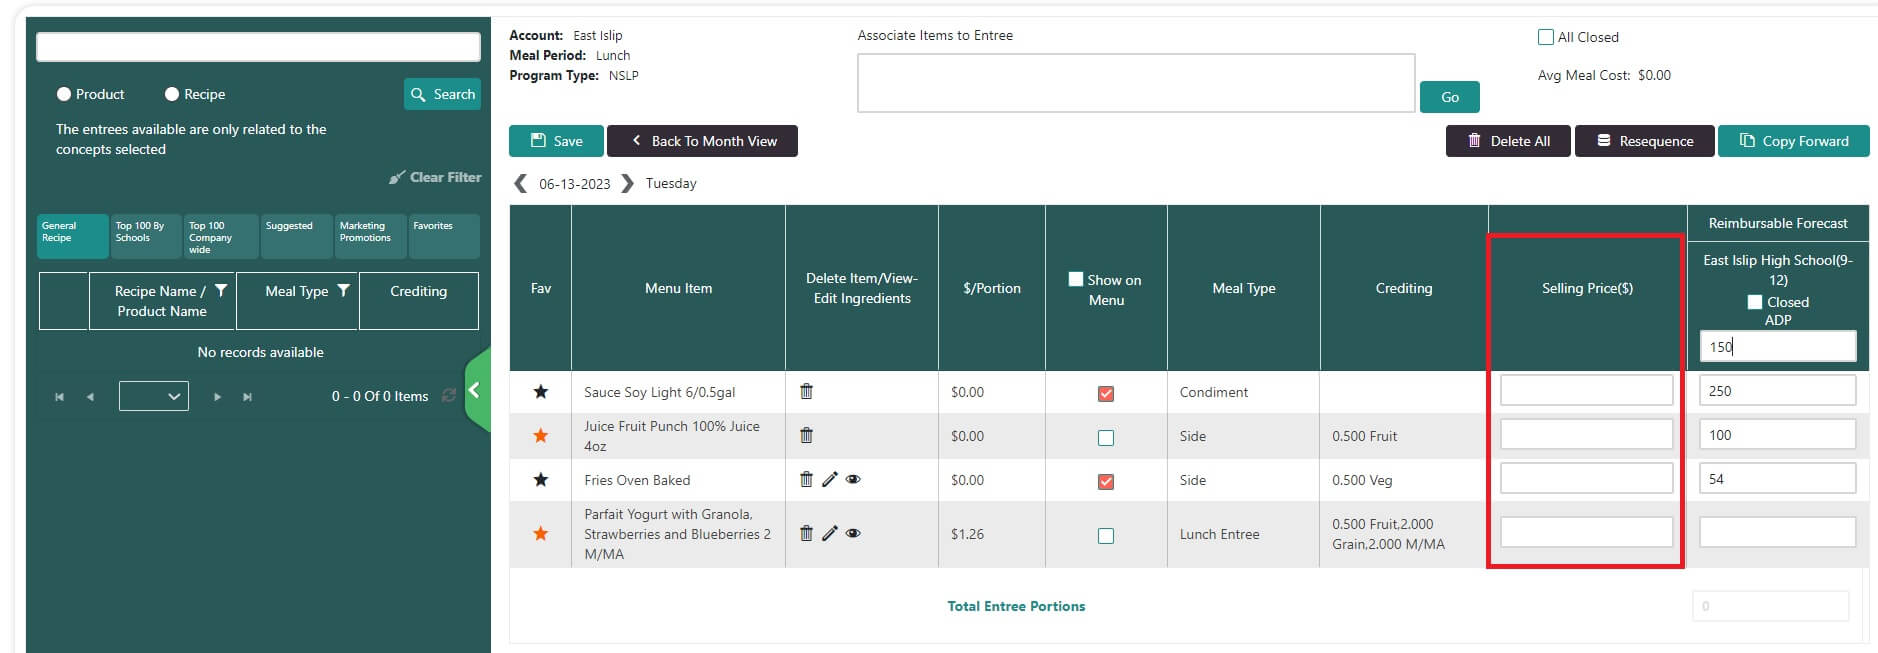
The 'Selling Price' column in the DC Menu Details screen is for use with specific non-NSLP/SBP locations only. All K-12 operations should disregard this column as it has no effect on your menus, your menu planning or DC functionality. For those locations approved and set up to use the Sell Price function in DC, the price will populate in the FD meal Planner and FD meal Planner pre-order platforms. To get the sell price to populate, fill in the actual sell price in the menu detail screen of DC when menu planning. You would need to do this for each day service. After entering the prices, click Save. This must be saved each time you enter a sell price. When all sell prices for the day, or month have been entered, post the menu to FD Meal planner by clicking the "Post to Webpage" button.