Product Master Summary
What Is Product Master Summary?
Product Master Summary tells you information about specific products from nutrient composition to ratings and which markets this will be available in. This section is important for keeping track of product information, ingredient information, substitutions, pricings, menu configuration for a product, order guides, any alternative names, crediting, unit conversions, attributes and the actual process of creating this product.
Navigate To Product Master Summary
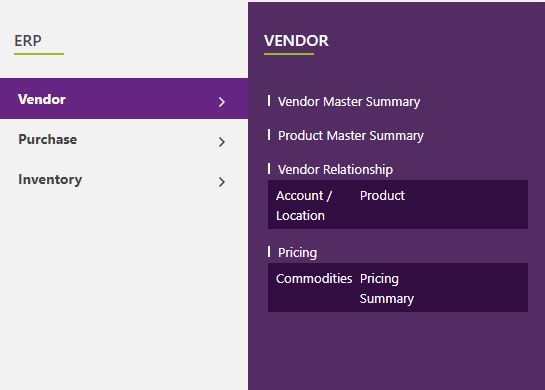
Click on ERP on the main navigation menu and hover on Vendor.
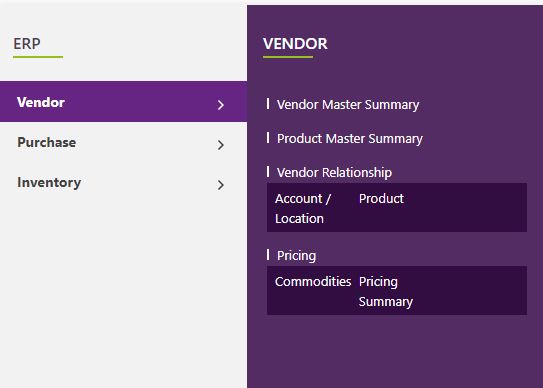
A new screen appears which shows the list of all of the core vendor tables. Locate the one which says Product Master Summary and click on it.
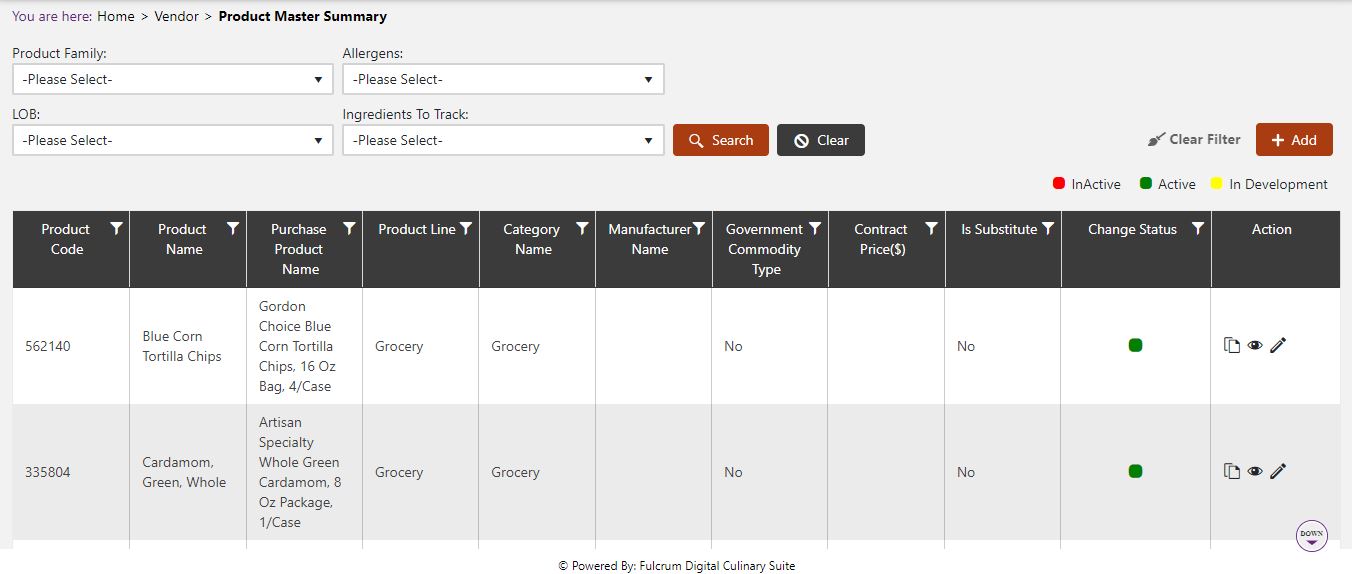
This will open up a screen where you can see all the active and inactive Product Master Summaries that are available for your company.
Add New Product
Click the Add button on the top right side of the screen.
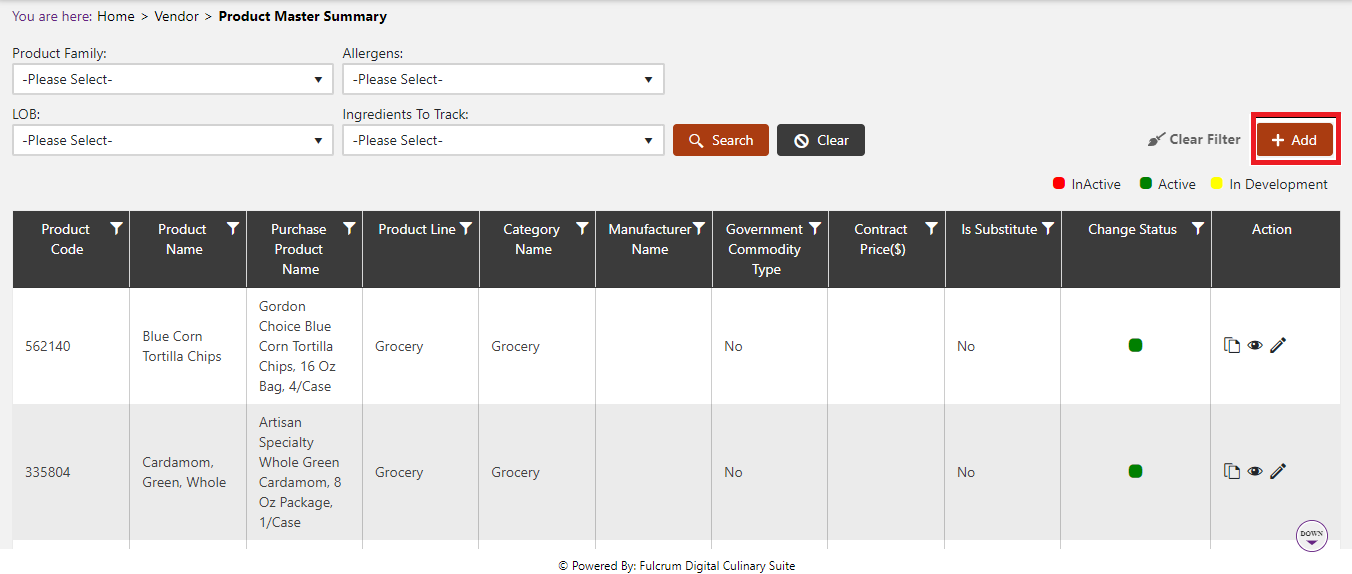
The system will open a popup screen in which you can fill in the following fields (Note: Mandatory fields are indicated by the * next to the name):
Primary
- Primary
- Rating: You can rate this product out of 5 stars.
- Product Code: This is automatically generated by the system.
- Product Name: Please enter the name of this product.
- Purchase Product Name: If your product has a different name at the time of purchase then write the name you want customers to see.
- Product Type: Select the Product Type from the dropdown list.
- Product Category: Select the Product Category from the dropdown list.
- Product Family: Click inside the textbox to choose from the Product Family list generated.
- Promote Product till?: Enter a date if this product is a limited time offer.
- Upload Image: Click the gray box with the green outline to upload an image of this product.
- Manufacturer Name: Include the Manufacturer Name from the list generated.
- Manufacturer Product Code: Write in the code the manufacturer uses for this product.
- Product Inventory Unit: Select the product’s unit from the list provided.
- Can Be Inventoried: Check the box if the product can be inventoried.
- Substitute Product: Check the box if this is a substitute product.
- Contract Price: Click in the box to enter a number.
- GTIN Number: Enter the GTIN Number (this is an identifying number for this product on the label).
- UPC Code: Enter the UPC Code (this is another identifying number for this product on the label).
- Maximum Threshold: Enter the maximum threshold for a dollar amount of this product.
- Note:Add any notes for this product.
- Attachments: Click upload to add any files for this product.
- Country: Choose the country.
- States: Click in the box to see the states and choose the ones that this product is available for.
- Product Line: Choose the Product Line, this will generate the table with all the LOBs with this Product Line. You will then click “Is available” if it is an available option for this LOB or “Can be Menued” if this product can be offered on the menu.
- Government Commodity: Click to see a list of options if this is a Government Commodity. If it is not, then click “No”.
Attributes
- Attributes
- Cuisines: Click the box to add Cuisines here.
- Meal Type: Click the box to add Meal Types here.
- Main Component: Click the box to add the Main Component here.
- Non Nutritive/ Non Allergenic: Click the box to add any allergens or non allergen identifiers here.
- Food Bar Option: Click to add any food bars here.
- Concept: Click the box to add any Concepts here. Click the Select all/Deselect all to either select all the concepts or clear all concepts from this attribute.
- Entrée Type: Click the box to add an entrée type.
Conversion
- Conversion
- Click the add button
- Quantity measure: Enter the quantity measure for a conversion.
- Product UOM: Enter the product’s unit of measure.
- Weight Measure: Enter the weight of the product.
- Weight UOM: Enter the weight unit of measure.
- For any alternative units, fill out the information below the same way as done above.
Nutrition
- Nutrition
- Measure: Click the box to enter a number for the measure of the manufacturer’s serving size.
- Unit: Enter the unit for this product.
- Allergens: Add any possible allergens that people may have to this product.
- Ingredients to Track: Click the box to add any ingredients to track for this product.
- Ingredient Statement Name: Include the product name here.
- Ingredient Statement: Include all of the ingredients here.
- Nutrients per (Specified Number) Gram: Enter the information about how much of each nutrient is in this product.
- Nutrition: Enter the name of the nutrient as well as the numeric amount of this nutrient is present in this product.
Crediting
- Crediting
- Click the add button
- Crediting Option (Name): Enter the name of the Crediting Option for this product.
- Program Type: Click the dropdown to see a list of Program Types to choose from.
- Meal Period: Click the box to see the available Meal Periods.
- From Grade: Click the dropdown to choose the starting grade this will be available to.
- To Grade: Click the dropdown to choose the grade this will be offered until.
- States: Click the box to add states.
- Crediting Type: Click the box to choose the Crediting Group here.
- Product Amount: Click the box to add an amount of the Product that will be offered.
- Crediting Unit: If this field applies, click the box to choose the unit.
- Creditable Amount: Click the box to enter a number for the Creditable Amount.
- Creditable Amount Unit: Click the box if this information is available to choose the unit.
- Click the check to confirm this information or the red circle with the line through it to cancel this entry.
Process
- Process
- Click the add button
- Prep Process Description: Enter the name of the Prep Process for this product.
- Select CND Product: Click the magnifying glass icon to choose the CND for this product according to the USDA.
- Yield Applied To: This is automatically at “1 Each”.
- Yield Type: This is automatically generated by the system.
- Loss/Gain: According to the Yield Type, choose whether there is a loss or gain.
- Amount: Choose the amount of the loss or gain of the Yield Type here.
- Unit: Choose the unit of the loss for the yield type here.
Alternate Names
- Alternate Names
- English Name: Include the English name for this product.
- English Description: Include the description of this product in English.
- Spanish Name: Include the Spanish name for this product.
- Spanish Description: Include the description of the product in Spanish.
- Legal Name (USDA): Include the legal name for this product
- Click the save button to have it show up on the table below.
- Click the add button when scrolling down the page to add another name here.
- Market: Click the dropdown arrow to choose from the Markets available.
- Location Type: Click the dropdown arrow to choose from the Location Types available for this product.
- Alternative Name: Click this to enter any alternative names for this product.
- Description: Enter the description for this product.
- Spanish Name: Include the Spanish name for this product.
- Spanish Description: Include the description of the product in Spanish.
Order Guide
- Order Guide
- Use this as a way of allowing this product to be available for different accounts.
Substitutions
- Substitutions
- Click the add button
- Click the Product Name to see a list of products to choose from. Choose one that would be a substation for this product from the list.
Pricing
- Pricing
- Click this to see the pricing of the product for your Markets and the effective date of the pricing.