Recipe Creation & Edit
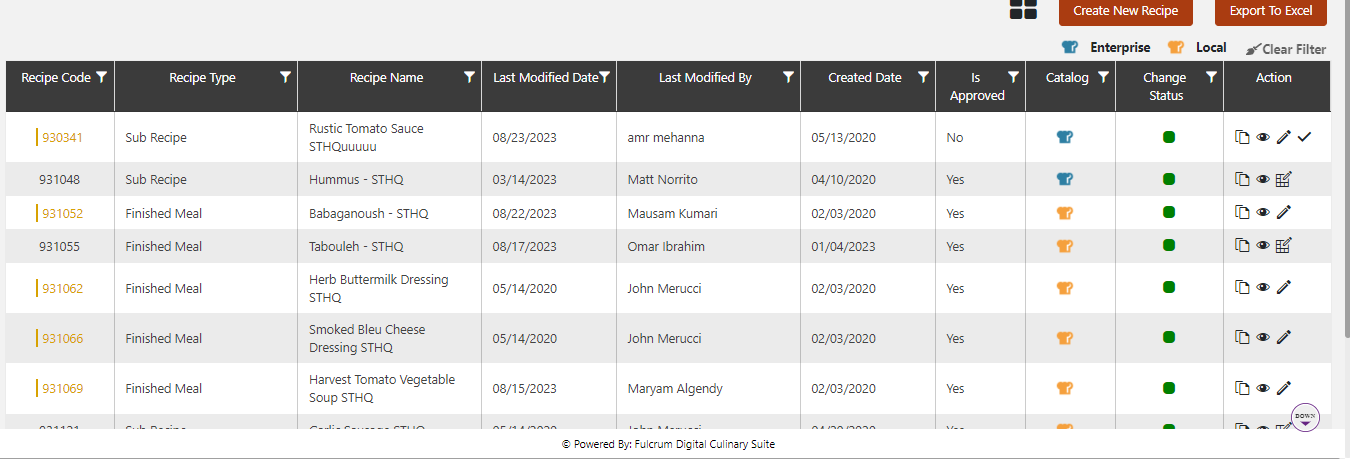
You can view 5,10,20,50 or 100 records at a time for any grid based results in CulinarySuite by choosing the suitable dropdown! ![]() To view more records in a grid, use the pagination option.
To view more records in a grid, use the pagination option. ![]()
Hover over the Recipe icon on the navigation menu. The Recipe Icon expands to display the different sub-function list. Click on Recipe Kit.
If the recipe creation access is provided, an Add button will appear on the top right corner of the screen above the list of recipes.
Clicking on the Add button will navigate to the Recipe Primary tab.
Recipe Creation: Primary Tab
The primary tab contains some of the basic information about the recipe.
Fill in the following fields in the Recipe primary screen. Items marked with an Asterix ‘*’ indicates that the field is mandatory.
- Recipe Name*: Name of the recipe that will be referred to and searchable by users.
- Recipe Type*: Specify if it is a finished meal or a sub recipe. Finished meals are generally items that can be consumed and put on a menu as is. Subrecipes are generally used as ingredients in other recipes.
- UPC Code: Unique UPC code associated with a recipe.
- Level of Difficulty*: Refers to the skill level required in order to make the recipe. Users can use this field as search criteria when creating a menu.
- HACCP Process*: Refers to the method of preparation required to serve this recipe which is used in the menu production record.
- Preparation*: Quantity of time that it takes to prepare the recipe prior to cooking.
- Cooking*: Quantity of time that it takes for the recipe to cook.
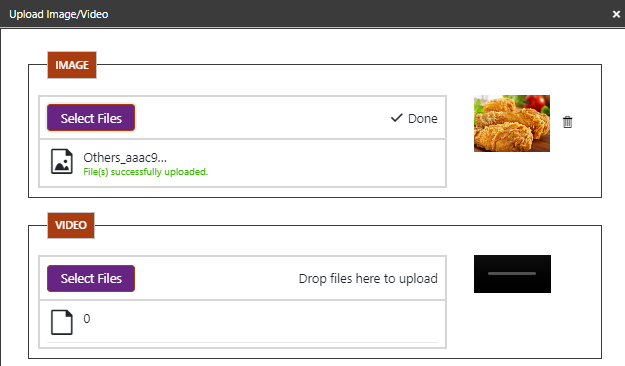
Click on the upload image box and choose a suitable image to assign an image for the recipe. This is the image that will appear on the MealPlanner website.
Upon successful upload, a confirmation message appears on the bottom of the screen.
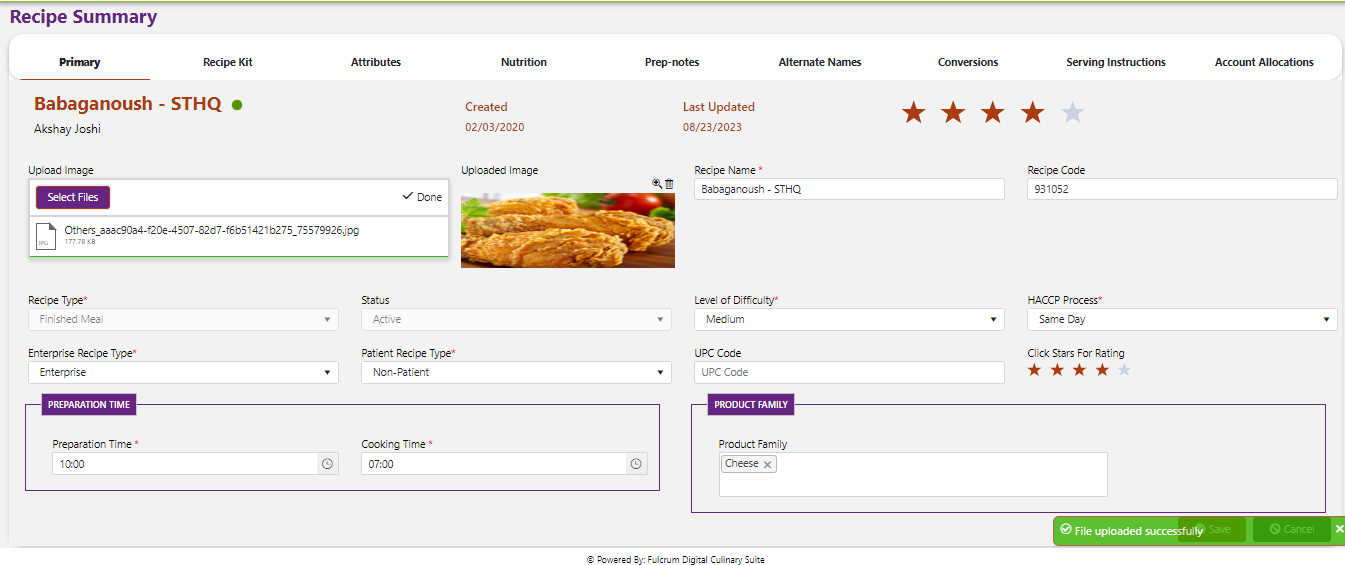
Click on the save button to complete the creation of a basic recipe.
✔️ Create a complex, finished meal recipe.
✔️ Upload a suitable image for the recipe and save.
✔️ Edit the ‘Recipe type’
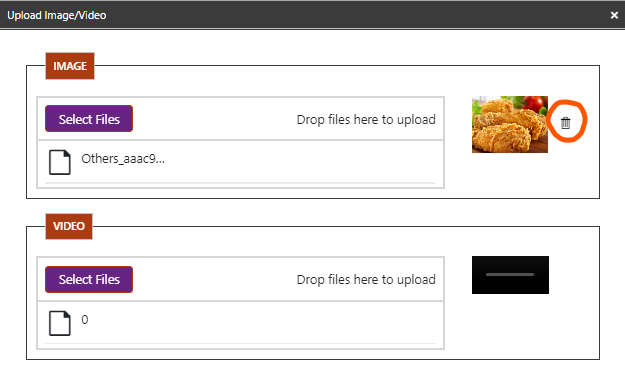
✔️ Delete and upload a new image.
✔️ Use the copy ![]() option from the Recipe summary screen to create a copy of an existing recipe.
option from the Recipe summary screen to create a copy of an existing recipe.
Recipe Creation: Recipe Kit Tab
Always specify the recipe kit sequence numbers in the multiples of ten.
Variants are alternate items used to create a single recipe kit making recipe management simpler.
The recipe kit section of a recipe contains 4 important sections each serving a unique purpose.
- Recipe portion details
- Line of Business
- Main recipe
- Variants
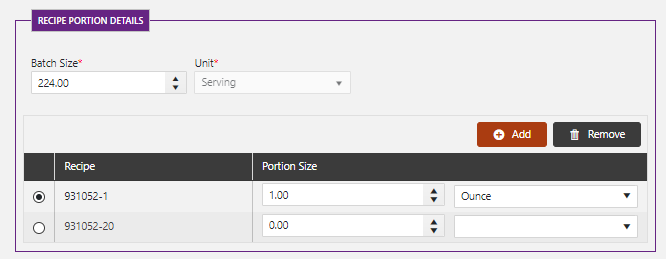
Set the Batch/Portion Size
Batch size represents the yield quantity of the recipe that is being created. All the ingredients in the recipe are entered in quantities to yield this batch size. Portion size is the amount of one portion of the recipe.
 |
|
Set the LOB/Location Types
Here you can select the various LOBs/Location types which are able to use this recipe (either on a menu or as an ingredient in another recipe). In order for a user to see it on their menu or as an ingredient it must be available to the LOB/Location Type of the location. Of course at least one ingredient in each sequence also needs to be available on the order guide as well. If this is a Finished Recipe, you can choose which LOB/Location Types can use this on their menu.
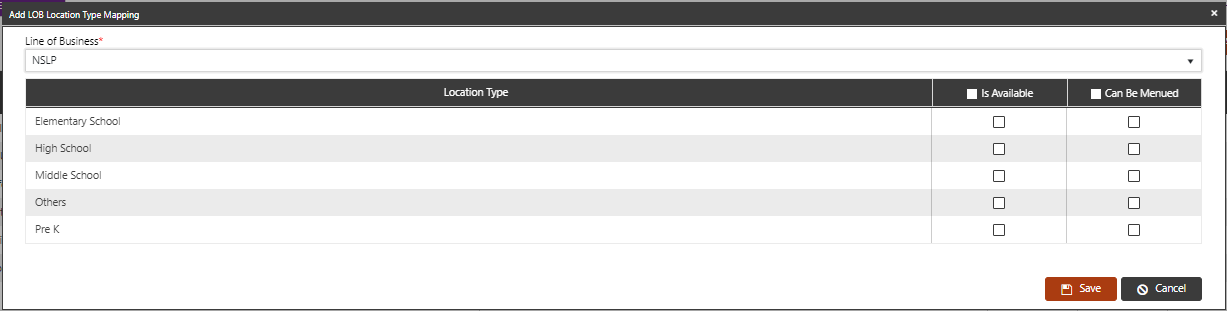 | Indicate if the recipe is set to be Available To and if it can be menued. Available to: Refers to location types that this recipe can be used in other recipes for. Displays for each of the location types for the LOB that has been clicked on. Can be Menued: Determines if the recipe version selected can be referenced on a menu for a specific LOB/Location Type combination. |
Add all the required Line of Business for the recipe being created and mark the necessary flags.
Yield Adjustment
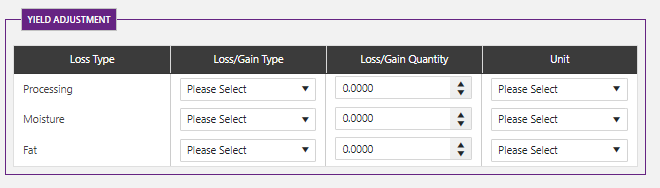
Use this if the preparation of the recipe will cause a change in the moisture, fat or general weight content of the entire recipe. Please note that editing the yield adjustment here will impact the final nutritional content of the entire recipe. You can add yield for individual components in the recipe in the sections below.
Add/Edit Ingredients
Add the individual ingredients that will makeup the recipe in this section. From the Main Recipe section click on the Add button to add ingredients and populate the following details.
a. Sequence: Refers to the order in which items should be displayed on a printed recipe as well as the order in which they should be used in a recipe.
b. Select Product/Recipe: Products from product master or active recipes from recipe master (for recipes it should be filtered by the LOB/Location types that are available to that recipe kit).
c. Quantity & Unit: Quantity of the corresponding product that needs to go into the recipe to create the batch size listed with its corresponding unit. Ingredients should be entered in their raw quantities in order to make the recipes. Utilize the process/yield adjustments to get the “as consumed” nutritionals & weight.
When the system is scaling recipes, it will try to round the quantities to measurable amounts instead of direct weight scaling. This means you will never see a unit like ‘0.335 teaspoon”. There is some leeway that the system will require in order to make adjustments like this. You can control the amount of leeway by providing input to the “Round To” and “Scaling Variance %” field. The system will utilize these two fields when scaling to determine the level of accuracy which is required. The lower the value, the more closely the system will scale to the actual weight of the ingredient. The system will try to scale as closely as possible to the actual amount and if required it will provide a second amount for that ingredient.
Round To: This is relevant to items that are utilized in quantity units (like Each). You can choose how the system has to increment these units when it is scaling. You can choose from 1/8th units to 1 whole unit. For example, you have a recipe that is using Eggs in the unit of “each”. The system needs to know how to round that value when it is scaling, You can choose to round it by 1/8ths which means that the system might tell you to use 1.125 eggs. Or you could choose to round it to the nearest whole unit, so the system will round up to the nearest whole egg. By default this is set to 1 – which will round to the nearest whole unit.
Scaling Variance: This is relevant to ingredients that are not used in quantity units. The system needs to know how much leeway it has between the actual weight of the ingredient and the scaled value it can display. By default this is set to 5%. This means that if the system finds when it is scaling that the scaled quantity it is displaying is more than 5% different than the actual weight of the ingredient, it will display a second unit in order to make it more accurate. In this case you might see a scaled quantity like “1 Tablespoon + 1 Teaspoon”. The lower you set this value, the more accurate the system will try to be, which means your scaled recipes will likely be displaying a second unit for each ingredient to make the scaled quantity closer to the actual ingredient weight.
Process: This field will show you the pre-populated processes that were associated to the product in the product master screen. This field serves two purposes, one is to instruct the person making the recipe on how to prepare this ingredient. The second is to get the “as consumed” nutritionals for the product. Selecting a process from the product level will automatically assign yield adjustments or usda nutritionals which are associated to that process (if applicable).
d. Yield Adjustment: The fat, moisture or processing gain or loss will get auto-populated from the product setup (if a process is selected). This yield factor is applicable to this one ingredient, not the entire recipe. If this is required to be overridden, update the details here. This is used to get the “as consumed” nutritionals and weight for a recipe item. Certain preparation methods will change the weight or the nutritional content of the item. You can set or adjust those changes here.
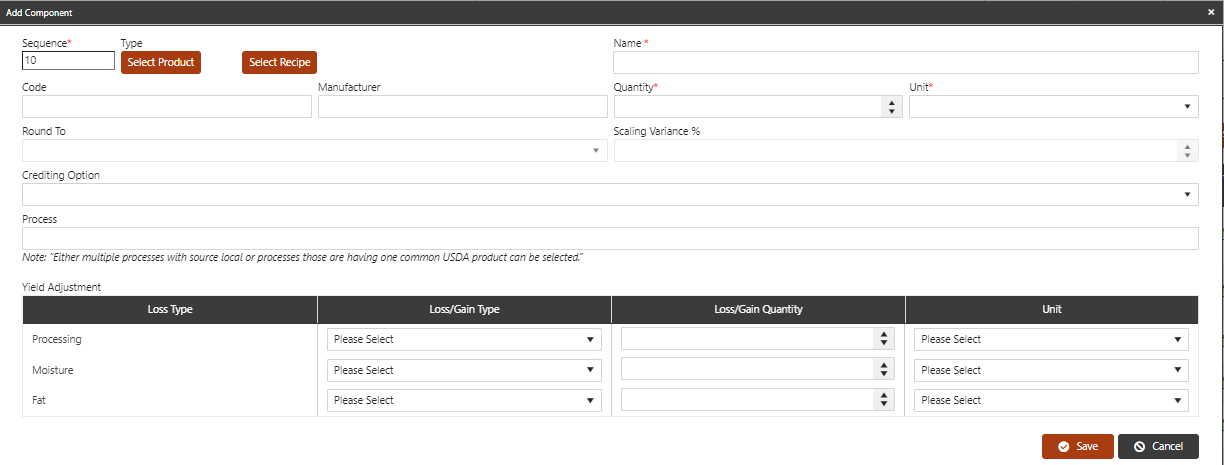
e. Once all the mandatory fields are filed in, click on the save button to save or the cancel button to navigate away from the screen without saving the data.
f. Repeat the process to add as many ingredients that are required for the recipe.
g. Use the
 to swap an ingredient with another,
  to delete the ingredient and
  to edit the ingredient.
Add Variants
At the end of the ingredient click the Add Variant button ![]() . Variants are items that can be used in place of the main ingredient at the discretion of the user when creating a menu. For example, when making a burger, one of the main ingredients may be 80/20 ground beef with a variant of 81/19 ground beef. When a user is adding this burger to their menu, they can choose which ground beef they want to use. All of the fields to enter for a variant are the same as for the main ingredients listed above
. Variants are items that can be used in place of the main ingredient at the discretion of the user when creating a menu. For example, when making a burger, one of the main ingredients may be 80/20 ground beef with a variant of 81/19 ground beef. When a user is adding this burger to their menu, they can choose which ground beef they want to use. All of the fields to enter for a variant are the same as for the main ingredients listed above
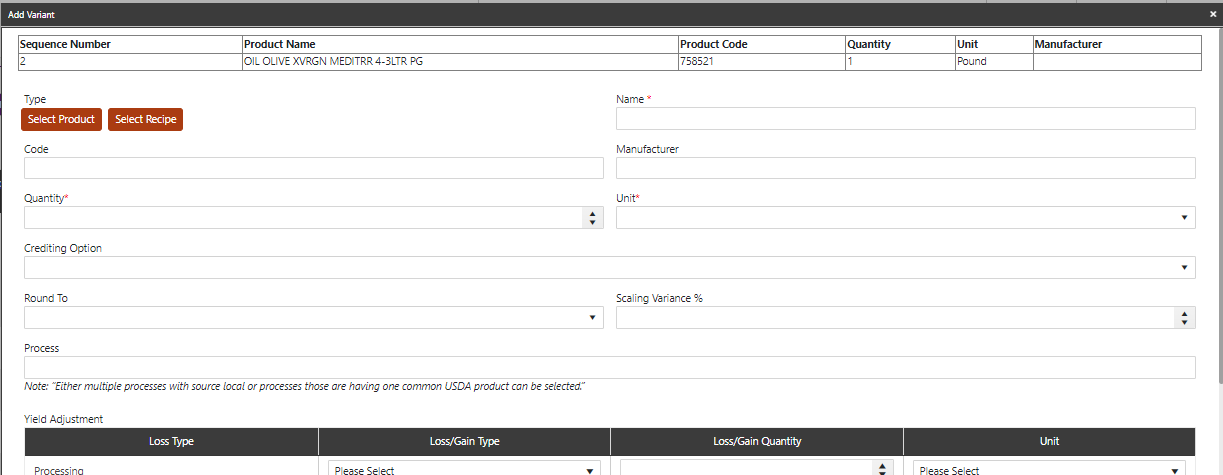
Once all the mandatory fields are filed in, click on the save button to save or the cancel button to navigate away from the screen without saving the data.
Click on the save button on the bottom right corner to save the changes made to the recipe kit screen.
If the portion size of the recipe is different for various lines of business, create a new ‘recipe version’ by clicking the ‘Add’ button on the ‘Recipe portion Details’ section and fill the ingredient quantities. The recipe ingredients and the variants will remain the same.
Variants are used in cases where similar products are available and instead of creating a different recipe, a single recipe could be created with the variation of the ingredient. Am example would be Beef burger made with a 4” 100 % whole wheat bun vs a 4” 100 % whole wheat sesame bun.
If all the mandatory fields are not updated, a warning message appears to indicate which fields are missed. For example -
![]()
✔️ Create a ‘Tilapia with tomatoes, black olives and corn recipe for one line of business (4 ounce Tilapia).
✔️ Use different type of tomatoes as variants.
✔️ Add a new recipe version for a different line of business with modified ingredient quantity (3.5 ounce Tilapia).
✔️ Try creating another recipe of your own choice!
Recipe Creation: Attributes Tab
Tagging attributes in a recipe allow you to search recipes more efficiently. Attributes are widely used in determining recipes that are available for different type of menus as well as searching items in menu creation. Association as many attributes during recipe creation should be made a mandatory practice.
Attributes are tags which are set as part of the recipe creation. The data appearing on the different attributes are managed under their respective master data management.

Cuisines: This field is informational and will help users search for items to add to their menu. Options will appear from the Cuisine master. You can choose to assign as few or as many as applicable to this recipe.
Meal Type: This field is required if the recipe can be put on a menu. The system will need to know what type of item this is. Items can be flagged as “entrée” for various meal periods, sides, condiments or beverages. If an item is marked as an “entrée”, it cannot also be marked as a side, condiment or beverage.
Subgroup: This field is informational and will help users search for items to add to their menu. Options will appear from the Subgroup master. You can choose to assign as few or as many as applicable to this recipe.
Main Component: Identify the type(s) of components that represent this recipe. This field is informational and will help users search for items to add to their menu. Options will appear from the Main Component master. You can choose to assign as few or as many as applicable to this recipe.
Food Bar: If this item can be used as an ingredient on a food bar in a menu, select the applicable food bars here. Options will appear from the Food Bar master. You can choose to assign as few or as many as applicable to this recipe.
Concept: This field is only applicable to recipes that can be menued and which have a Meal Type = Entrée. You can use this field to specify which concept stations this item can be menued under. This is applicable only to entrées as sides can be menued under any concept on a station based concept menu. Options will appear from the Concept master. You can choose to assign as few or as many as applicable to this recipe.
Entrée Type: This field is informational and will help users search for items to add to their menu. Options will appear from the Entrée Type master. You can choose to assign as few or as many as applicable to this recipe.
- Click on the Attributes tab on the recipe creation.
- Click on the cuisine field, a drop down will open.
- Chose as many values that are applicable to the recipe.
- Perform the same action to the rest of the attributes available in the screen.
- Click on save on the bottom right corner of the screen.
- A confirmation message will appear indicating successful saving of the data.
RECIPE CREATION: NUTRITION
This screen allows the user to review nutritional, allergen, ingredient, attribute data as well as pricing for a selected version and combination of ingredients. The layout is similar to the recipe kit screen except the data is not editable.
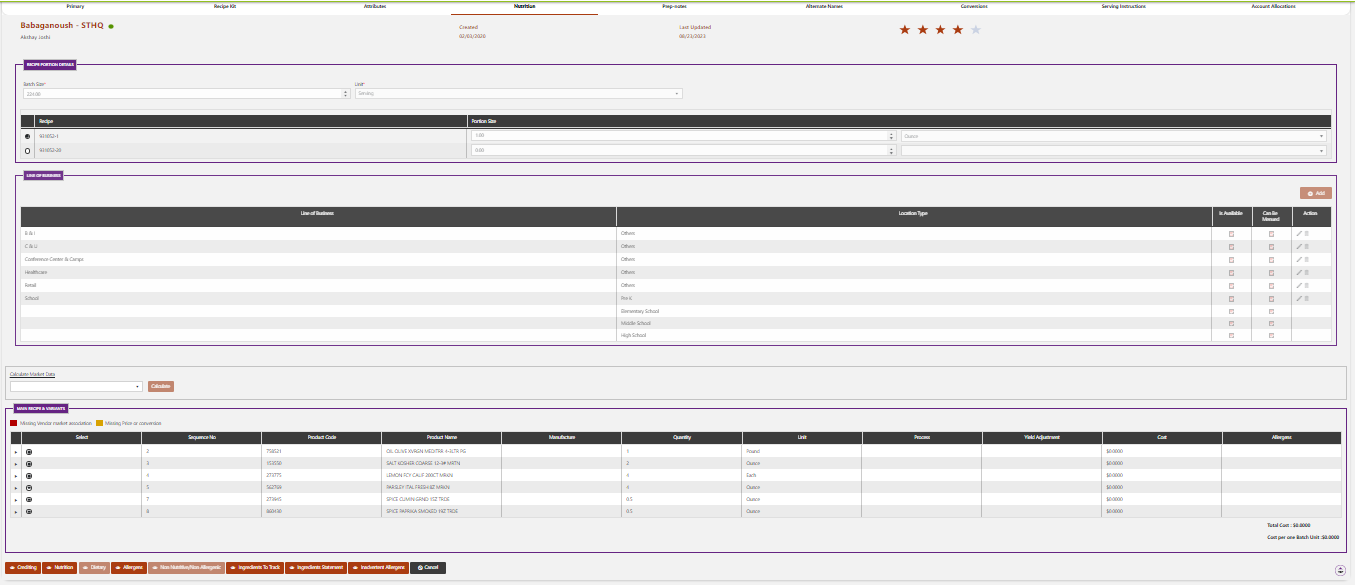
To view the nutritional, allergen, ingredient, attribute or cost data:
- Select the recipe version that you want to view (if there is more than one). By default the first version of the recipe will be selected. The Line of business section will display the LOB/Location Types that the selected version is available to. The ingredient section will display the ingredients and quantities that are applicable to the selected version.
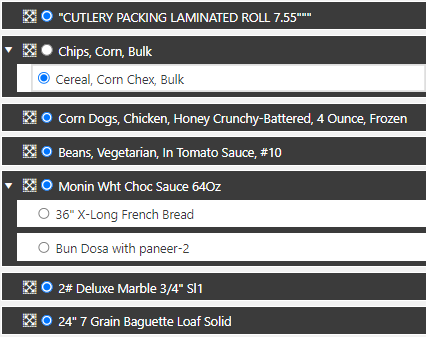
- In the ingredient section, select the combination of ingredients that you would like to view. Clicking the arrow next to an ingredient will display the variants that are available. Click the radio button next to an ingredient or variant in each sequence that you would like to see data for.
- Click the buttons on the bottom of the screen to view the data for the selected components.
Crediting:

Click on the Crediting button to view the creditable components for the selection of ingredients. A new window will appear which will display the creditable components and amounts for each program, meal period, grade range and state. These values are automatically calculated by the system based on the crediting data which was setup on the product master screen. You can overwrite these values by simply clicking in the box where the value is listed, changing the number and clicking Save. You can restore the system generated values by clicking Refresh Overwritten Values. Please note that if you change the quantity or crediting selection of a component on the recipe kit, it will automatically recalculate these values.
To view the creditable amount per ingredient click on the View Details button next to the program that you would like to crediting combination you would like to see. This will open a screen which will display each ingredient, its weight and the unrounded creditable amount each ingredient contributes (if applicable). At the bottom you will see both the total unrounded and rounded for each group.
- Select a combination of ingredients
- Click the crediting button
- Overwrite one of the existing crediting values and save.
- Restore the crediting to the system generated values.
Nutrition:
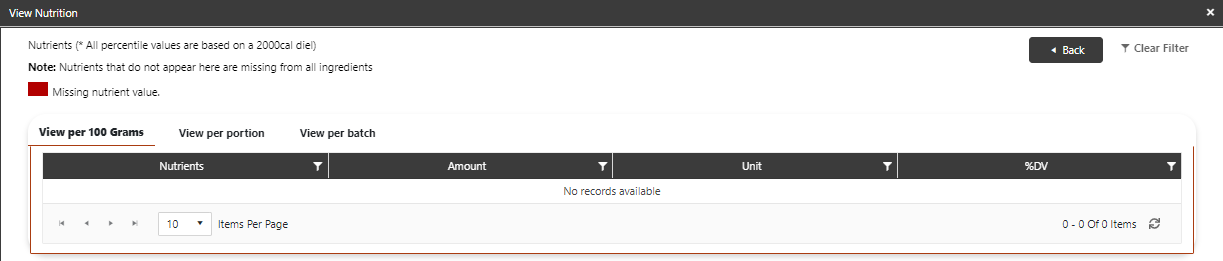
Click on the Nutrition button to view the nutrient values for the selected components. This will open a screen which will display all the nutrients which are applicable. There are three options across the top of the screen which represent different quantities you can view for the nutrients.
View per 100 Grams: This will display the nutritional values for 100 grams of the recipe. This is the default option that will display when the Nutrition button is clicked.
View Per Portion: This will display the nutritional values for 1 batch unit of the recipe. Finished recipes have a batch unit of “Portion” so in essence, this will display the value for one portion of the recipe. For subrecipes, this will display the nutritional value for 1 of whatever is selected as the batch unit.
View Per Batch: This will display the nutritional values for the entire batch of the recipe. For example, if a recipe has a batch size/unit = 20 portions, then the nutritionals which display with this option will be for all 20 portions.
You can use the sorting and filtering options to look for specific nutrients or to sort the display.
- Select a combination of ingredients
- Click the Nutrition button
- View the nutrients by portion
- Filter for a specific nutrient
Dietary:

Click on the Dietary button to view any dietary rules that this recipe meets with the selected combination of components. The system will evaluate the rules that are listed in the Dietary Master and determine if the selected combination of ingredients meets those rules. If it does, then the system will display the dietary attribute here.
Allergens:
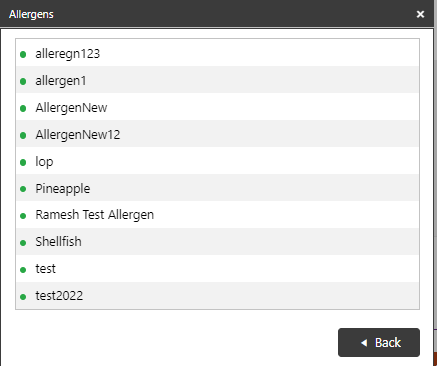
Click on the Allergens button to view the allergens that are applicable to the selected combination of components. The system will gather this information based on the allergens that are setup on the purchased product.
Non Nutritive/Non Allergenic:

Click on the Non Nutritive Non Allergenic button to view the attributes that are applicable to the selected combination of components. The system will evaluate each attribute based on the settings which are applied in the Non Nutritive Non Allergenic master. If the selected combination of ingredients meets those settings then the attribute will appear here.
Ingredients to Track:

Click on the Ingredients to Track button to view any ingredients to track that are applicable to the selected combination of components. The system will gather this information based on the ingredients to track that are setup on the purchased product.
Ingredient Statement:
Click on the Ingredient Statement button to view the ingredient statement for the recipe based on the selected components. The system will display the ingredient list in weight order (i.e. item with the highest recipe weight is listed first).
![]()
Inadvertent Allergens:
Click on the Inadvertent Allergens button to view the inadvertent allergens that are applicable to the selected combination of components. The system will gather this information based on the inadvertent allergens that are setup on the purchased product.
- Select a combination of ingredients
- Click the various attribute buttons to view the data
Cost:
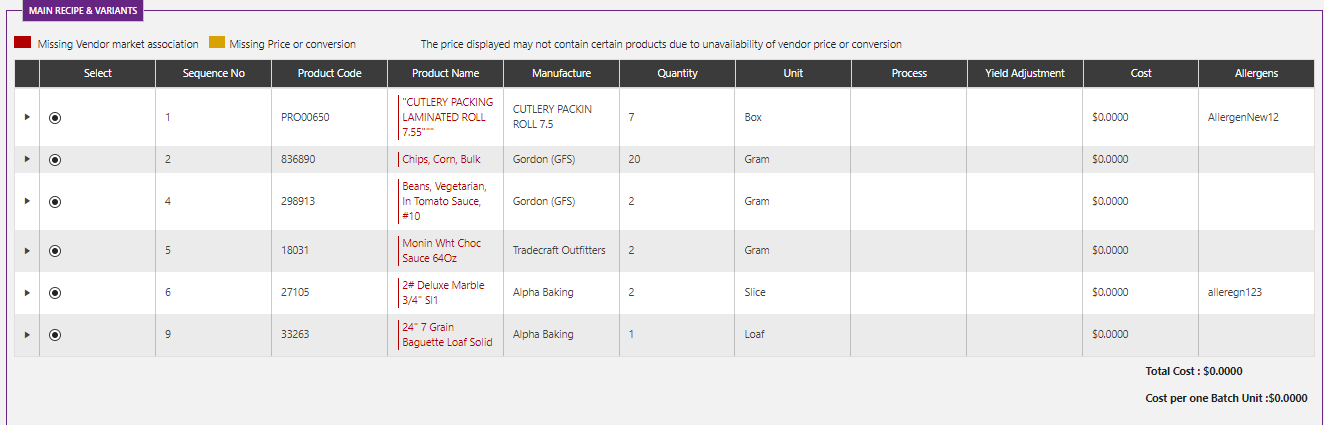
Select the Market from the Calculate Market Data dropdown to view the cost of the selected components for the selected market. Click on the Calculate button to retrieve the values. The system will look at the current price (for selected market) for the vendors that are setup in the Recipe > Vendor Price Association screen. Items that are missing a price will be displayed in yellow. Items that do not have a price for that vendor/market will display in red.
The value will display in the “Cost” column next to each ingredient. At the bottom of the section you will see “Total Cost”. This is the total cost to make the entire batch of the recipe. You will also see “Cost per one Batch Unit”. This is the total cost for one of whatever the batch unit is. For example, if the batch is for 20 portions, then one batch unit would be 1 portion.
- Select a combination of ingredients
- Select a market to view the cost for
- Click the arrow next to an ingredient to view the cost of the variants
- Select one of the variants with a different cost than the original item
- View the new total cost
Recipe Creation: Prep Notes
This screen allows the user to create instructions (in general or based on ingredients) to prepare the recipe. These instructions will display on the recipe printout in step order.
Adding Steps
Click on the Add Step button to add a step ![]() . By default this is step number 1 and will be the first step to display in the recipe printout. There is no limit to the number of steps you can add to a recipe.
. By default this is step number 1 and will be the first step to display in the recipe printout. There is no limit to the number of steps you can add to a recipe.
By default there are no specific ingredients assigned to a step so the product name will display “NA”. If no ingredient is associated to a step then that step will always be displayed on the recipe printout (regardless of what combination of ingredients a user chooses). In the below example, the instructions for boiling the water and cooking the pasta are not associated to an ingredient. This is because the instructions are always the same regardless of what type of pasta is actually used.
You can associate a step with a specific ingredient but it is only necessary if the instructions are specific to that ingredient and there are multiple variants for the ingredient which could have different preparation instructions. In the below example, a user could choose to make this recipe with cheese sauce or shredded cheese. Depending on which ingredient they are going to use, the instructions will be different. Associating the ingredients to this step means that we can add different instructions for the cheese sauce than for the shredded cheese. When a user chooses to make the recipe with cheese sauce, then the instructions for that ingredient will show and the instructions for the shredded cheese will not.
To associate an ingredient with a step click on the arrow icon ![]() next to the ingredient listed on the left side of the screen. Drag it over to the applicable step (where the corresponding arrow icon is displayed
next to the ingredient listed on the left side of the screen. Drag it over to the applicable step (where the corresponding arrow icon is displayed ![]() ). When the step turns green, you can drop the ingredient. The ingredient and all of it’s variants will be added to that step. Enter the applicable instructions next to each ingredient in that step.
). When the step turns green, you can drop the ingredient. The ingredient and all of it’s variants will be added to that step. Enter the applicable instructions next to each ingredient in that step.

- Add a new step
- Add an ingredient with variants to that step by following the instructions above
- Enter unique instructions for each ingredient
- Add a new step
- Do not associate an ingredient to the step, enter a standard set of instructions that should always appear on the recipe
Adding Images to Steps
You may add images to steps to help illustrate the instructions. These images will appear next to the step on the recipe printout. To add images, click on the image icon ![]() next to the ingredient you want to illustrate.
next to the ingredient you want to illustrate.
Click on the Upload Image button on the popup.
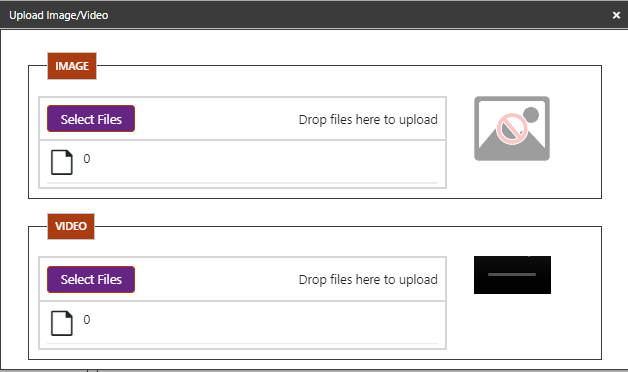 Select the appropriate image from your computer or network and click Open to select it
Once associated, a new icon will appear next to the image icon for the step/ingredient. You can click on the arrow icon to download the image.

To remove the image, click on the image icon ![]() and click on the X to remove the image.
and click on the X to remove the image.
- Click on the image icon next to a step/ingredient
- Add an appropriate image to the step and save
Removing Ingredients from Steps
If a step has more than one ingredient associated to it, you can remove one by clicking on the trash can icon ![]() next to the specific ingredient. If there is only one line associated to the step, you will not be able to delete the individual line. Instead, you can delete the entire step by clicking the trash can icon to the right of the step number.
next to the specific ingredient. If there is only one line associated to the step, you will not be able to delete the individual line. Instead, you can delete the entire step by clicking the trash can icon to the right of the step number.
Shuffle Steps
The system will display the instructions on the printout in the order they are listed in on this screen. You can change the sequence of the steps to re-order them if needed. To do this, click on the Shuffle Steps button ![]() . The system will display a popup screen with all the steps and the ingredients that are associated to them (if any).
. The system will display a popup screen with all the steps and the ingredients that are associated to them (if any).
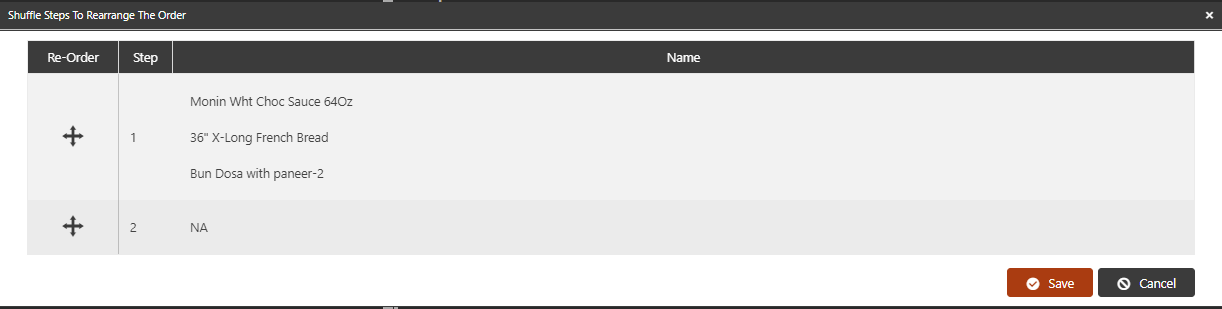
To change the order, click on the arrow icon ![]() and drag the selected step up or down to the existing step in that sequence. The existing step will turn green and you can release the mouse to drop the step in that position. This will insert the step to this new position and change the sequence of all the other steps accordingly. A success message will appear on the screen that the original step was shuffled with the new step. Click Save to apply the changes.
and drag the selected step up or down to the existing step in that sequence. The existing step will turn green and you can release the mouse to drop the step in that position. This will insert the step to this new position and change the sequence of all the other steps accordingly. A success message will appear on the screen that the original step was shuffled with the new step. Click Save to apply the changes.
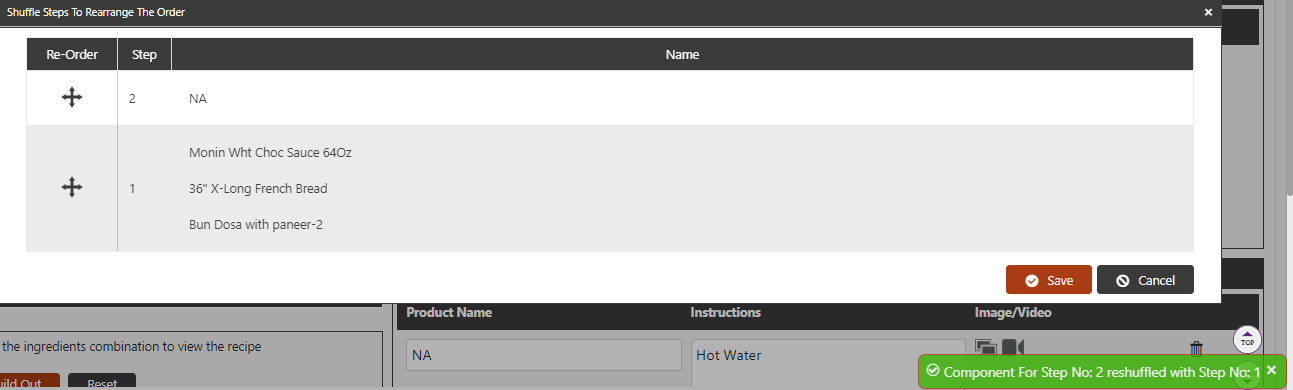
- Click on the Shuffle Steps button
- Change the order of two of the steps and click Save
View Build Out
The build out option will allow you to see the prep notes/images that are applicable to a specific set of ingredients. Click the radio button next to one ingredient in each sequence to view the build out for that combination.
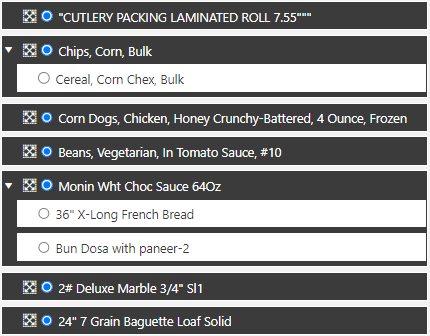
Click on the Build Out button to view the prep notes/images that would be displayed for that combination.

Clicking on the Reset button will set the ingredient selection back to the default components.
- Select one ingredient from each sequence
- Click the Build Out button to view the build out
Scale Recipe
You can scale and print the recipe for a selected set of components. Select the combination of ingredients that you want to use by clicking the radio button next to one ingredient in each sequence.
Enter the quantity you want to scale to in the Quantity To Produce field and click Print.

The system will generate a zip file containing the pdf of the recipe. Click on the downloads bar to access the file.

Double click on the PDF to open the recipe printout.
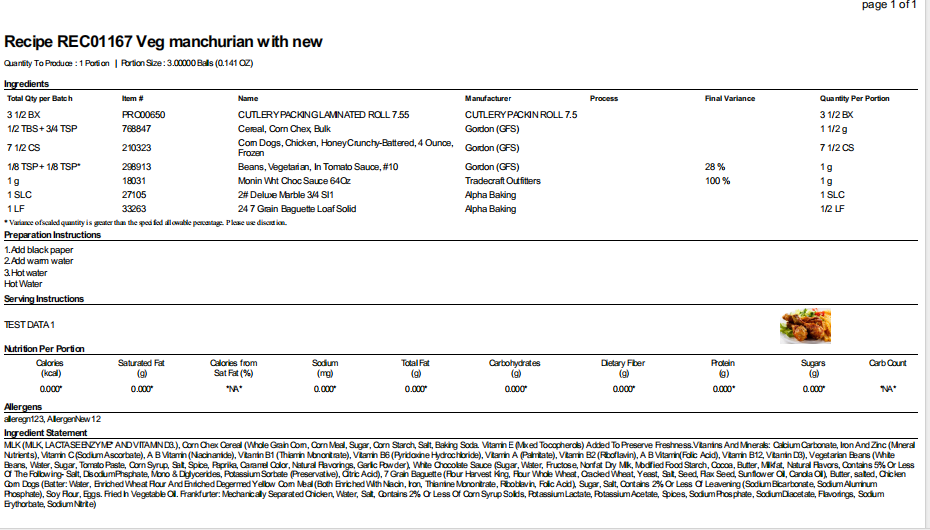
- Select one ingredient from each sequence
- Enter the scaling quantity in the Quantity to Produce field
- Click Print to view the scaled recipe printout
Recipe Creation: Alternate Names
This screen allows the user to enter a name and description for the recipe that will appear on the menu. If this is not filled in, then the system will display the recipe using the name entered on the primary tab. This is only applicable if the “Can be Menued” flag is checked for at least one LOB/location type on the recipe kit tab.
English Name: This field is the default name that will appear in the menu box and on meal planner if this recipe is used on a menu. This is required if the recipe can be used on a menu.
English Description: This field is the default description that will appear in the menu box and on meal planner when this recipe is used on a menu. The user has the ability to choose whether to show a description for an item on their menu or not.
Spanish Name: This field is currently required however, it is not currently used on the meal planner. For this reason, you can either enter a Spanish translation or just copy the English name to this field. Spanish Description, Legal Name and Ingredient Statement Name are no longer required. You can leave these fields blank.
Assign a Regional Name by Location Type

Sometimes recipes need to have different names in different regions or for various grade groups. For example, in some regions of the country a sub may be called “Hero”, in other regions you may want to refer to it as a “Grinder”. Another example would be perhaps in elementary schools you want to call orange slices “Orange Smiles” because they sell better that way whereas in middle/high school you just want to call them “Orange Slices”. You have the ability to set specific names that will appear when the recipe is used on a menu in that market or location type by adding them under the Market Specific Alternate Name section.
- Click the Add button

- Choose the market that this name will be applicable for from the drop down. This will refer to the data in the Market master table.
- Choose the location type that this name will be applicable for from the drop down. This will refer to the data in the Location Type master table. Please note, only one selection can be made at a time so if the same name is applicable to all location types in a particular region, you may need to enter multiple lines
- Enter the name (in the primary language) of the menu item in the Alternate Name field that you would like to display for this item based on the prior selections.
- Enter the Description of the item (in the primary language) that you would like to display for this item based on the prior selections.
- Spanish name and description are currently required fields but they will not display on the meal planner (as that is translated using translation technology and will not use this field). Either enter the Spanish translation if desired, or copy the name and description entered above into these fields.
- Click the checkmark next to the line to save.

In the below example, when a High School location in the market of Schools NY – NSLP Schools uses this item on their menu, it will display as “Meatball Hero”. When a High School location in the market of Schools PA – NSLP Schools uses this item on their menu, it will display as “Meatball Grinder”. For everyone else, it will use the default name of “Meatball Sandwich” which is listed in the English name field.
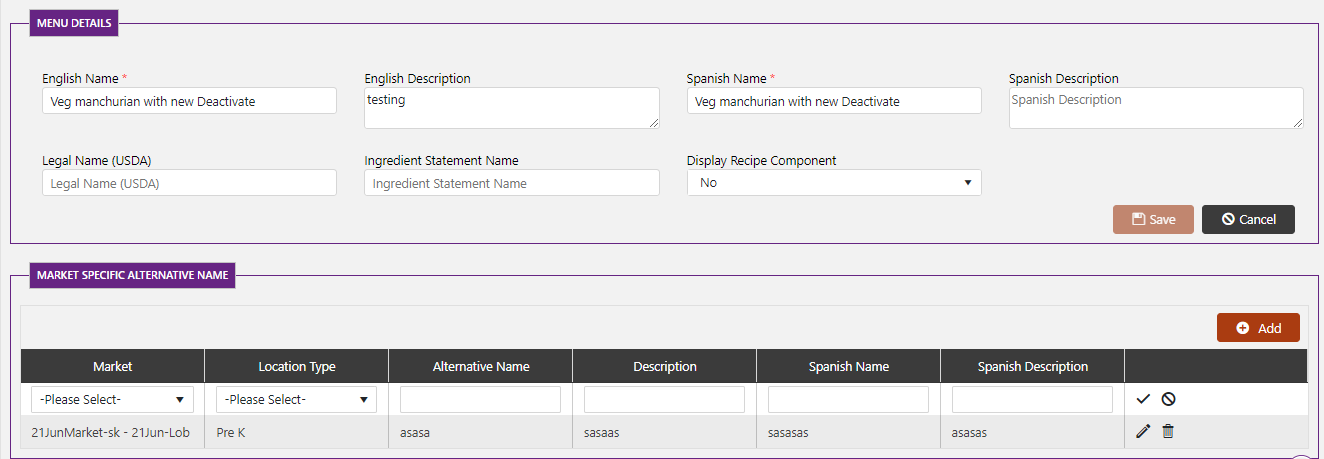
- Add a special name for this recipe for a specific market/location type
- Add a special name for this recipe for a different market/location type
Recipe Creation: Conversions
This screen is mainly used to associate alternative units to subrecipes. This will allow you to use the subrecipe as an ingredient in a main recipe in units other than those which are associated to the batch unit. For example, if I have a subrecipe for Tomato Sauce which has a batch size of 20 pounds. When I use this tomato sauce in a recipe for Lasagna, the system will allow me to use it in any weight unit (i.e. grams, pounds, ounce). If I want to measure the tomato sauce in a recipe using cups, then I would need to add a conversion so the system will be able to understand the relationship between weight and Cup. For this example, adding this conversion will allow me to use the unit of “Cups”, “Teaspoon” or “Tablespoon”, “Ounce”, “Pound”, “Gram” when adding this as an ingredient to a main recipe. It will also allow the system to scale up or down between all these units when it is scaling this component as an ingredient. To add a conversion:
- Click on the Add button
- Enter the quantity to convert FROM in the Quantity Measure field
- Select one of the available units from the dropdown (these are the units that are currently available to the recipe based on the batch unit and other conversions). This should correspond to the quantity to convert from.
- Enter the quantity to convert TO in the Weight Measure field
- Select the corresponding unit from the unit master in the Weight UOM field.
- Click the checkmark to save the conversion
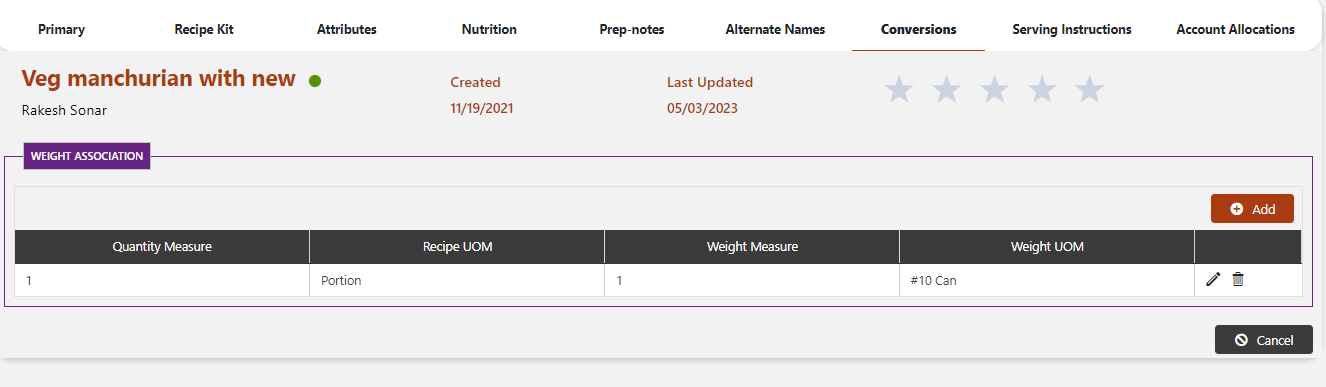
Please note that the system has it’s own standard conversions built in. Therefore, you do not need to add a conversion for both cups and tablespoons. You only need to add a conversion to one of those. The system will automatically understand how to convert to the other corresponding units.
Recipe Creation: Conversions
This screen will allow you to add specific instructions for serving this recipe. Each recipe version can have it’s own set of serving instructions (since portion size may be different between two recipe versions). These instructions will display on the recipe printout in the “Serving Instructions” section. A box for each recipe version will automatically be listed on this screen. Click the pencil icon next to the version that you would like to add instructions for and enter the text for the instructions in the Instruction box. You also have the ability to add images to illustrate the instruction. In the Edit instructions screen, click on the Upload File button. This will open a screen where you can access the images on your machine. Once you locate the image click “Open” to select it. The image will be added to the screen and a success message will appear. Click the Update button once complete.


You can delete the instruction and image by clicking on the trash can icon next to the serving instruction.